HOW TO CREATE WIRELESS HOTSPOT ON WINDOWS 8
18:39
A wireless hotspot (wifi
hotspot) has become a basic necessity in our life, because we need to connect
our devices together to share information, and windows 8 users normally find it
difficult to achieve this since there is no button that says push this to
activate wifi hotspot. In this tutorial am going to solve that issue by showing
the easiest way that can be accomplished on a windows 8 computer.
First go to search bar and
type “command prompt” right click it when it appears and select run as
administrator because you need administrator privileges to create your wifi hotspot.
The administrator window
should look like this
Type “netsh
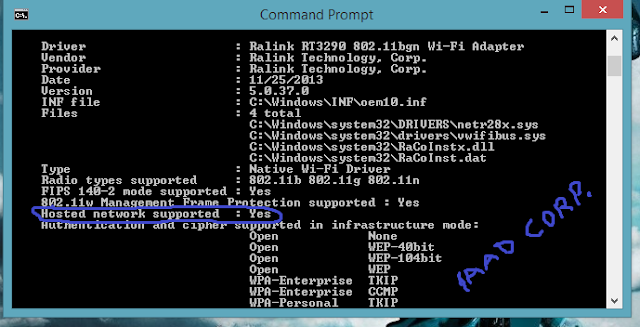
wlan show drivers” on the command
prompt window. This lets you know if you have the capability to create a wifi hotspot with your system
It now shows you your drivers
and check if your hosted network says “YES”
Now you can go on with your
work. Type “netsh wlan set hostednetwork mode = allow ssid = iaadCorp
key = ovuobaSampson” then press the
“enter key” you should see a window similar to this. NOTE: “iaadCorp” is your hotspot name which
you can set to anything you wish while “ovuobaSampson” is your hotspot password
which you can also set to anything you wish which must be up to or more than 8
characters long.
Ok now type “netsh wlan
start hostednetwork”
Well done, now you have
created your wireless hotspot. If you have errors like “the hosted network couldn’t be
started”.Try troubleshooting your network adapter by going to control panel
-> network and internet -> network
and sharing center-> change adapter settings(by the side bar) now right
click on your wifi and choose diagnose and then after that, attempt starting
the hostednetwork OR go to the control panel, then search for device manager in
the search bar and then find your network adapter and disable and enable the
network adapter and try starting again .
Now if no issues go to the
search bar and type control panel and open the control panel. Then click “view network
status and tasks”
Ok, now by the side bar
choose “change adapter
settings”
Next, look for the device you
use to connect to the internet . I am currently using an Airtel broadband
connection using a Huawei 3G modem, so I right click and select properties
Next, select the sharing tab
and check the box that says “Allow other users to connect through this
computer’s internet connection”. Also Select a network from the drop down list
make sure that it is identical to the hosted network you just created (wifi hotspot). Then click Ok. You can now be able to detect
and share your internet connection with your device.
When you are done you can close
the hosted network by simply running the command prompt with administrator
privileges and then type this “netsh wlan stop hostednetwork”
If you don’t like this you
can always download apps that will help you create a wifi hotspot in one click,
so try any.
So those are the steps to
create wifi hotspot using a windows 8 computer, If you found the tutorial
interesting and educating don’t forget to share. I will really appreciate that
and comment on any issue you encounter doing this or if it worked out perfectly
for you.


1 comments
Pretty good post. I just stumbled upon your blog and wanted to say that I have really enjoyed reading your blog posts. Any way I'll be subscribing to your feed and I hope you post again soon. Big thanks for the useful info. helium miners for sale
ReplyDelete